
Welcome to our Trader “Getting Started” Guide! Whether you're completely new to the world of crypto or have some experience and are looking to dive deeper, this guide is for you. By the end of this post, you'll have set up your very own crypto wallet, chosen a trading strategy to participate in, and made your first deposit, all in about 20 minutes.
Please note: Due to regulatory restrictions, deposits are not available in the US and a handful of other countries at this time. We are hopeful that as the regulatory climate evolves, we will be able to support the US market and offer our services to US-based users in the future.
Let’s get started!
Step 1: Set up your wallet
You might be familiar with platforms like Coinbase or other centralised exchanges where you can buy and hold your cryptocurrency. While these platforms may be convenient, the strategies offered by Trading Strategy are part of the vast DeFi (decentralised finance) ecosystem. Automated strategies running on the Trading Strategy protocol use smart contract vaults on the blockchain for handling cryptocurrencies or tokens that have been deposited into the strategies — the Trading Strategy team doesn't have access to them. To interact with these smart contract vaults, you'll need a non-custodial wallet.
A non-custodial wallet (or self-custodial wallet as some say) means that you have complete control over your crypto assets — similar to keeping them in a safe in your home. This offers greater security and autonomy, as only you have access to your assets. However, with this control comes responsibility: if you lose your secret recovery phrase or private key of your wallet, no one else can help you regain access to your wallet. It's essential to keep your recovery information safe and secure.
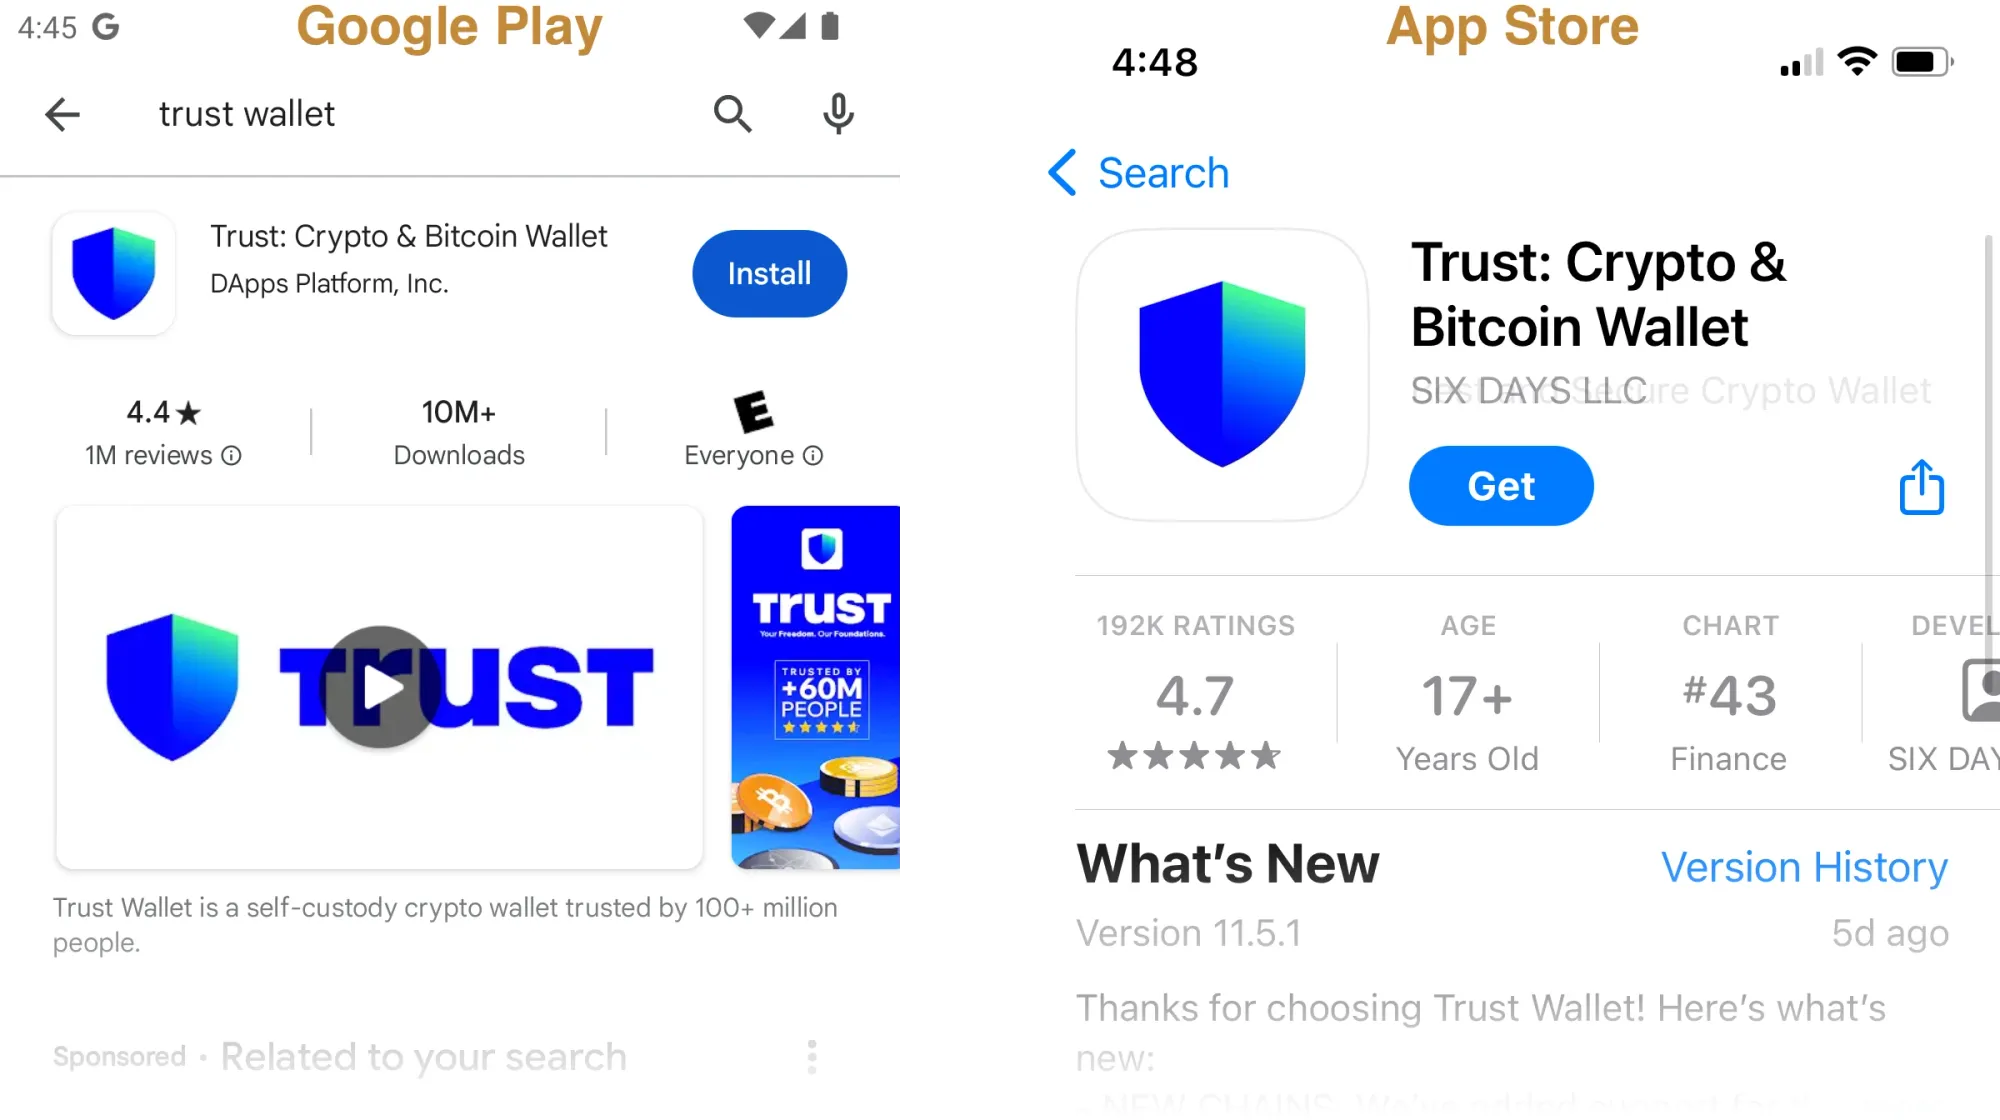
For this tutorial, we’ll be using Trust Wallet. Our criteria for selecting a wallet included: a mobile wallet with a strong user base and high ratings on both iPhone and Android, support for the WalletConnect protocol, ease of purchasing the required crypto assets with a credit or debit card, user-friendly interface, and proven compatibility with our DeFi strategies. There are many excellent wallet apps available, but Trust Wallet scored the highest across these criteria. [1]
If you prefer another wallet, feel free to give it a try and let us know your experience! We've tested our protocol on a variety of mobile and browser wallets and found that most of them work well. For mobile wallets, you'll want to confirm that they support the WalletConnect protocol. Also note that not all wallets make it as easy to purchase the required crypto assets, so you may need to use a third-party crypto exchange.
To install Trust Wallet, search for it in the Google Play Store or iPhone App Store. Note the logo and developer to ensure you have the correct app ("DApps Platform Inc." on Google Play, "SIX DAYS LLC" on the App Store at the time of writing this article). Click the "Install" or "Get" button and confirm your selection.
Click “Create a new Wallet” and choose whether to back up your seed phrase manually or using Google Drive (for Android) or iCloud (for iPhone). We recommend manually writing down your seed phrase and storing it somewhere safe. Depending on your preferences, you may also back it up via Google Drive or iCloud for added peace of mind.
After completing your wallet setup and adding a passcode or thumbprint/Face ID verification, you’ll be prompted to allow notifications. While it's optional, enabling notifications will make it easier to respond to wallet signature and transaction verification requests in the steps that follow.
Great job! You’ve successfully set up your wallet and are now ready to explore and choose a strategy for your first deposit.
Step 2: Choose a strategy for your first deposit
Visit our strategies page to view all currently available strategies. While you can access this page from both desktop and mobile devices, you may find it easier to compare and analyse strategies on a desktop browser, which is what we'll use for this tutorial. Here, you can quickly scan key metrics and review the 90-day performance history for each strategy. Clicking on any strategy will provide you with more detailed information, including a comprehensive description of its methodology, performance metrics, backtesting results, and more. [2]

If you're anything like us, you could spend hours diving into this data! While we encourage thorough analysis, for your first deposit, consider starting with a small deposit amount to get familiar with the process. This approach can reduce the pressure of trying to find the "perfect" strategy right away and help you gain confidence as you learn the ropes.
Step 3: Connect your wallet
For our first deposit, we’ve chosen the ETH-BTC-USDC momentum strategy. We'll connect the Trading Strategy web app to the wallet we set up earlier. This process will help us identify the specific blockchain and crypto assets needed for participating in this strategy, which will be crucial in the next step (adding funds to our wallet).
From the strategy overview page, click the “Connect wallet” button next to the strategy name to launch the connect wallet wizard. On the second page of the wizard, click “Connect wallet” again to open a dialog box where you can select your preferred wallet. Choose “WalletConnect (QR code)” to display a QR code that you can scan with your wallet.
Open the Trust Wallet app on your phone and click the scanner icon under the search bar. The first time you do this, you may be prompted to allow camera access to the Trust app. Once you grant access and scan the QR code, a “Connect DApp” dialog should appear. Click “Connect” to complete the wallet connection.
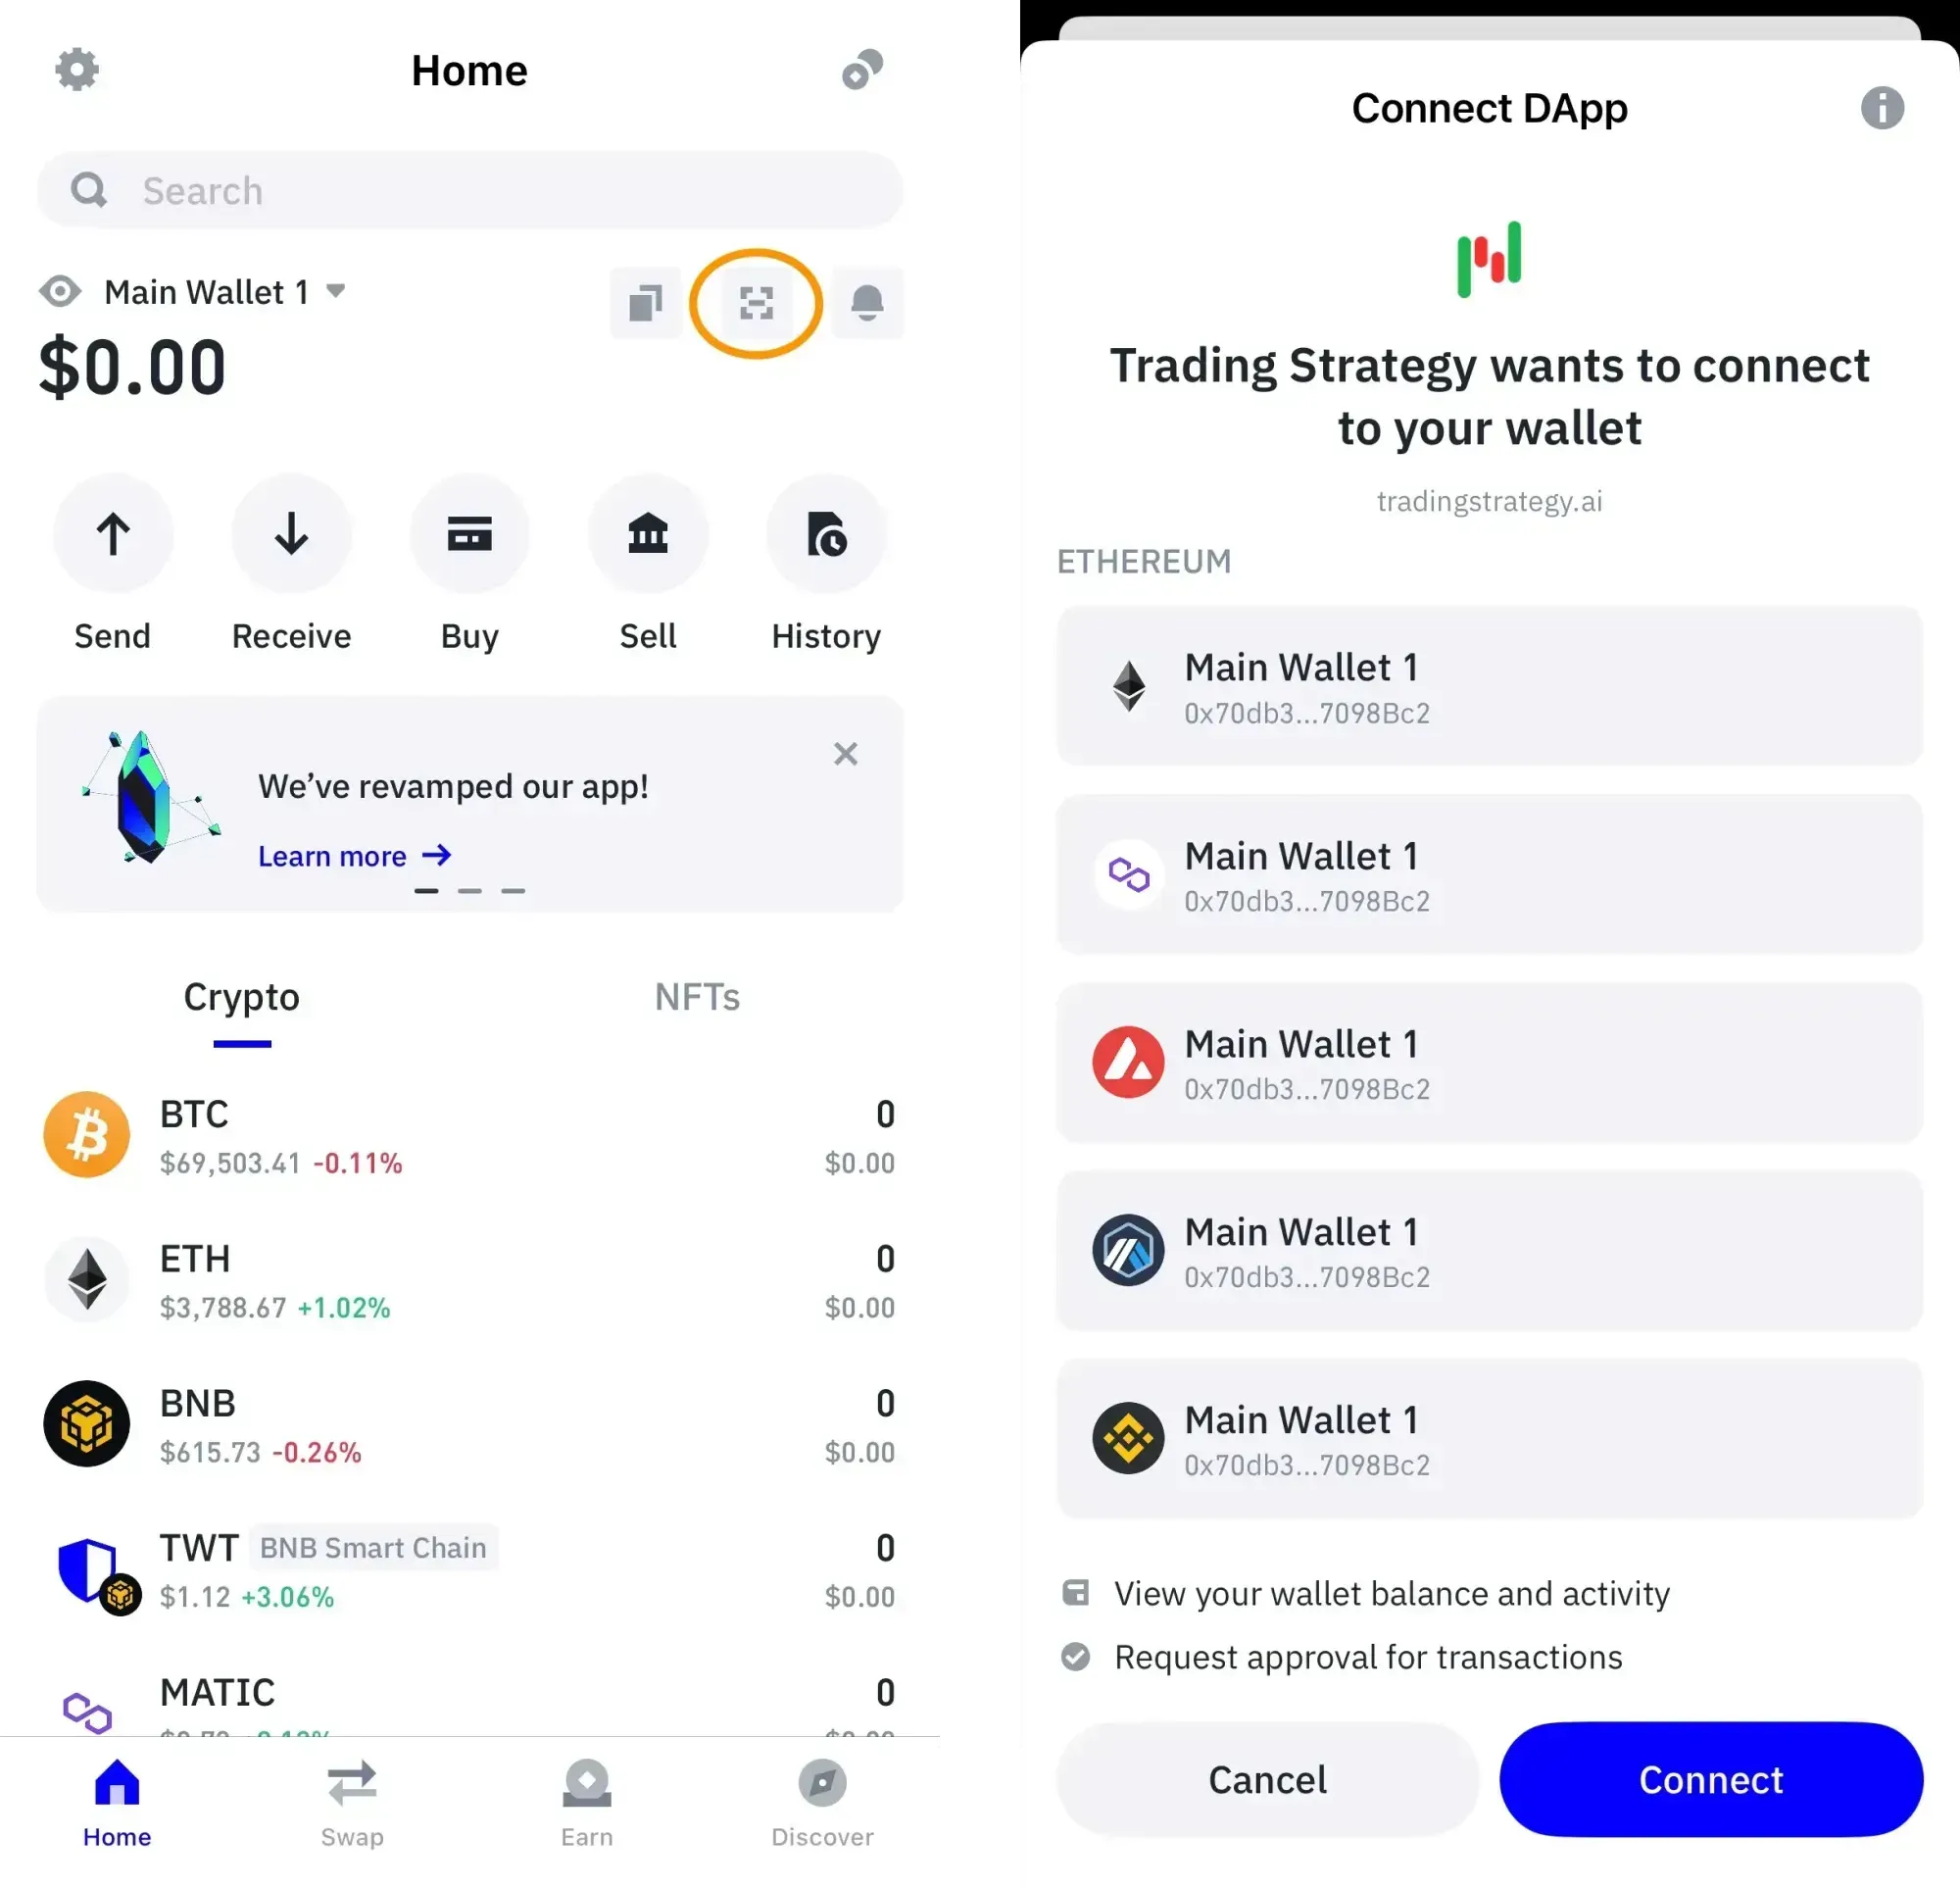
Returning to your desktop browser, the QR code should disappear, and the page will now display your wallet connection details. If a “wrong network” warning appears, click the “Switch network” button to change the network to the correct blockchain (in this case, Polygon). Take note of the network, as you'll need this in Step 4.
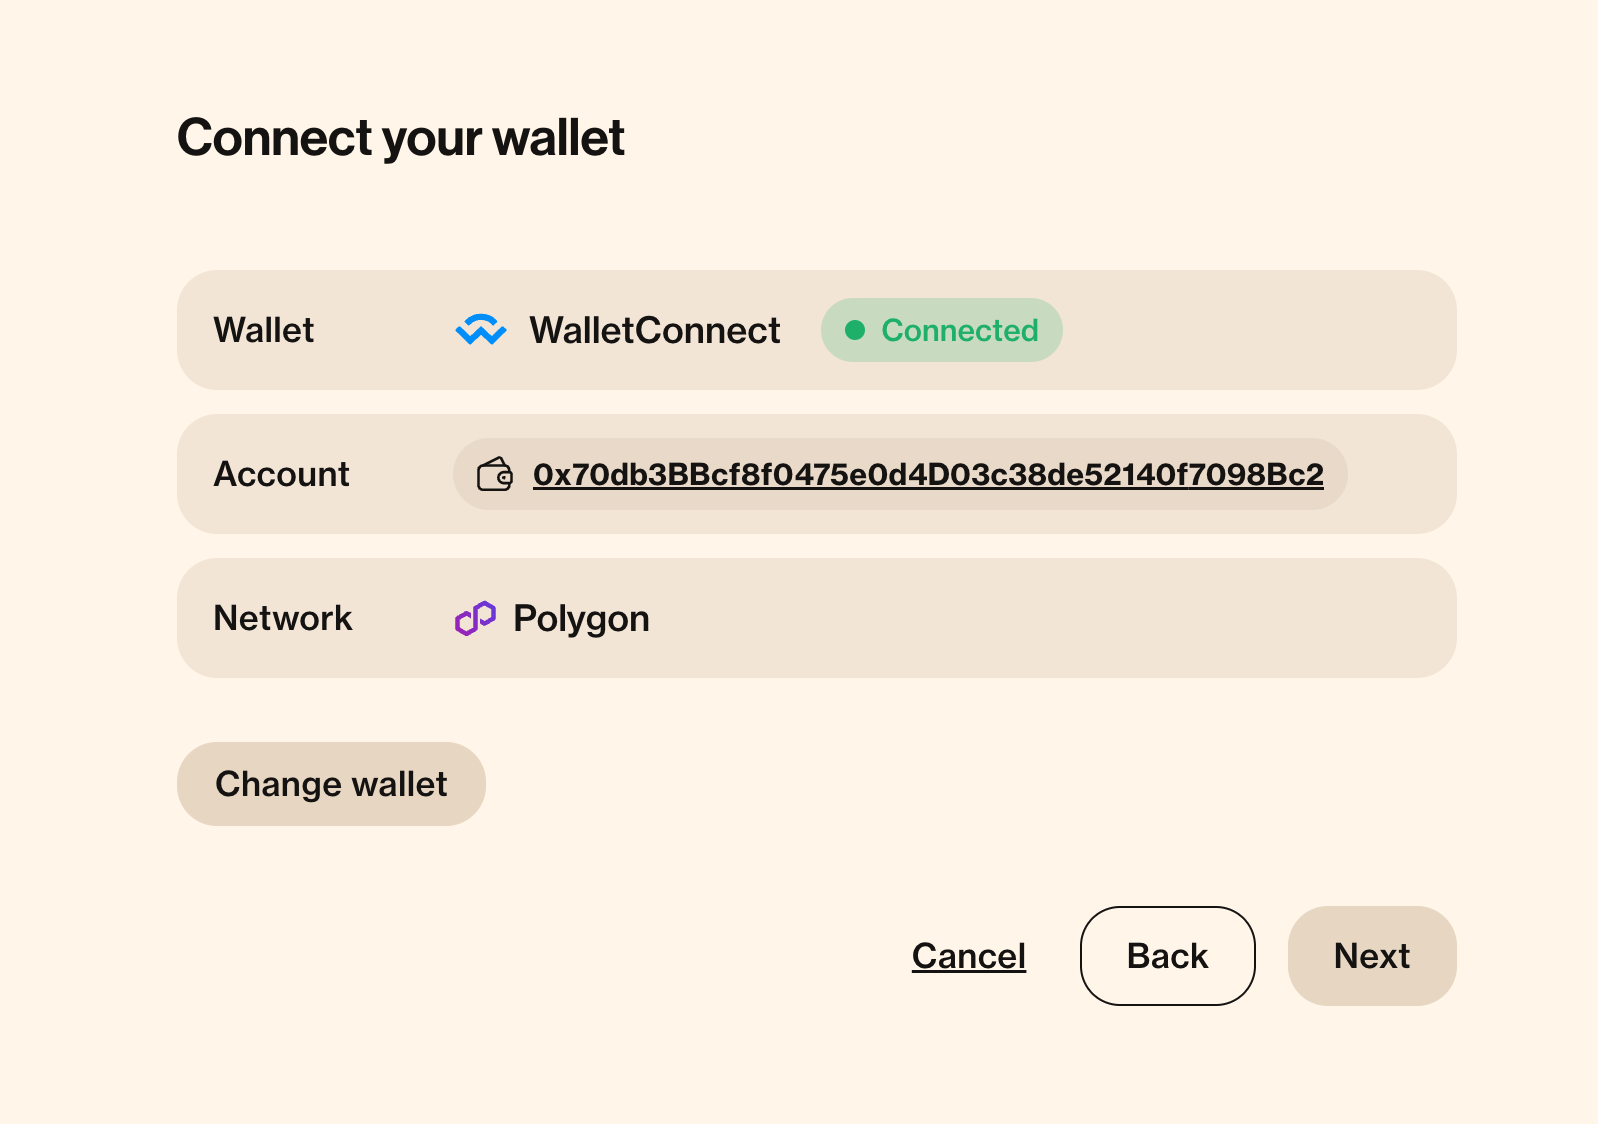
Click “Next” to proceed to the “Wallet balance” step. At this point, your balances will be 0.00 since you haven’t yet added funds to your new wallet. Take note of the two crypto tokens displayed here, as you’ll need to purchase some amount of both in order to participate in the strategy. The first one is the native currency for the blockchain used by this strategy — in this case, MATIC, the native currency for Polygon. You’ll need a small amount of this currency to pay gas fees of the Polygon network for the deposit transaction. The second one is the denomination token that you’ll deposit in exchange for shares of the strategy — in this case, USDC.e (a stablecoin that is pegged to the value of the US dollar).

What’s the “.e” about at the end of “USDC”? For historical reasons, there are multiple versions of the USDC token on some blockchains (including Polygon). The “.e” indicates that we’ll need bridged USDC tokens for this strategy.
Click “Next” twice to exit out of the connect wallet wizard. Nice work — your wallet is now connected!
Step 4: Add some funds
With the information we’ve learned from the previous step, we’re now ready to add funds to our wallet. Open Trust Wallet and click the “Buy” icon towards the top of the screen. Change “All Networks” to the network you identified in Step 3 (e.g., Polygon for our example strategy).
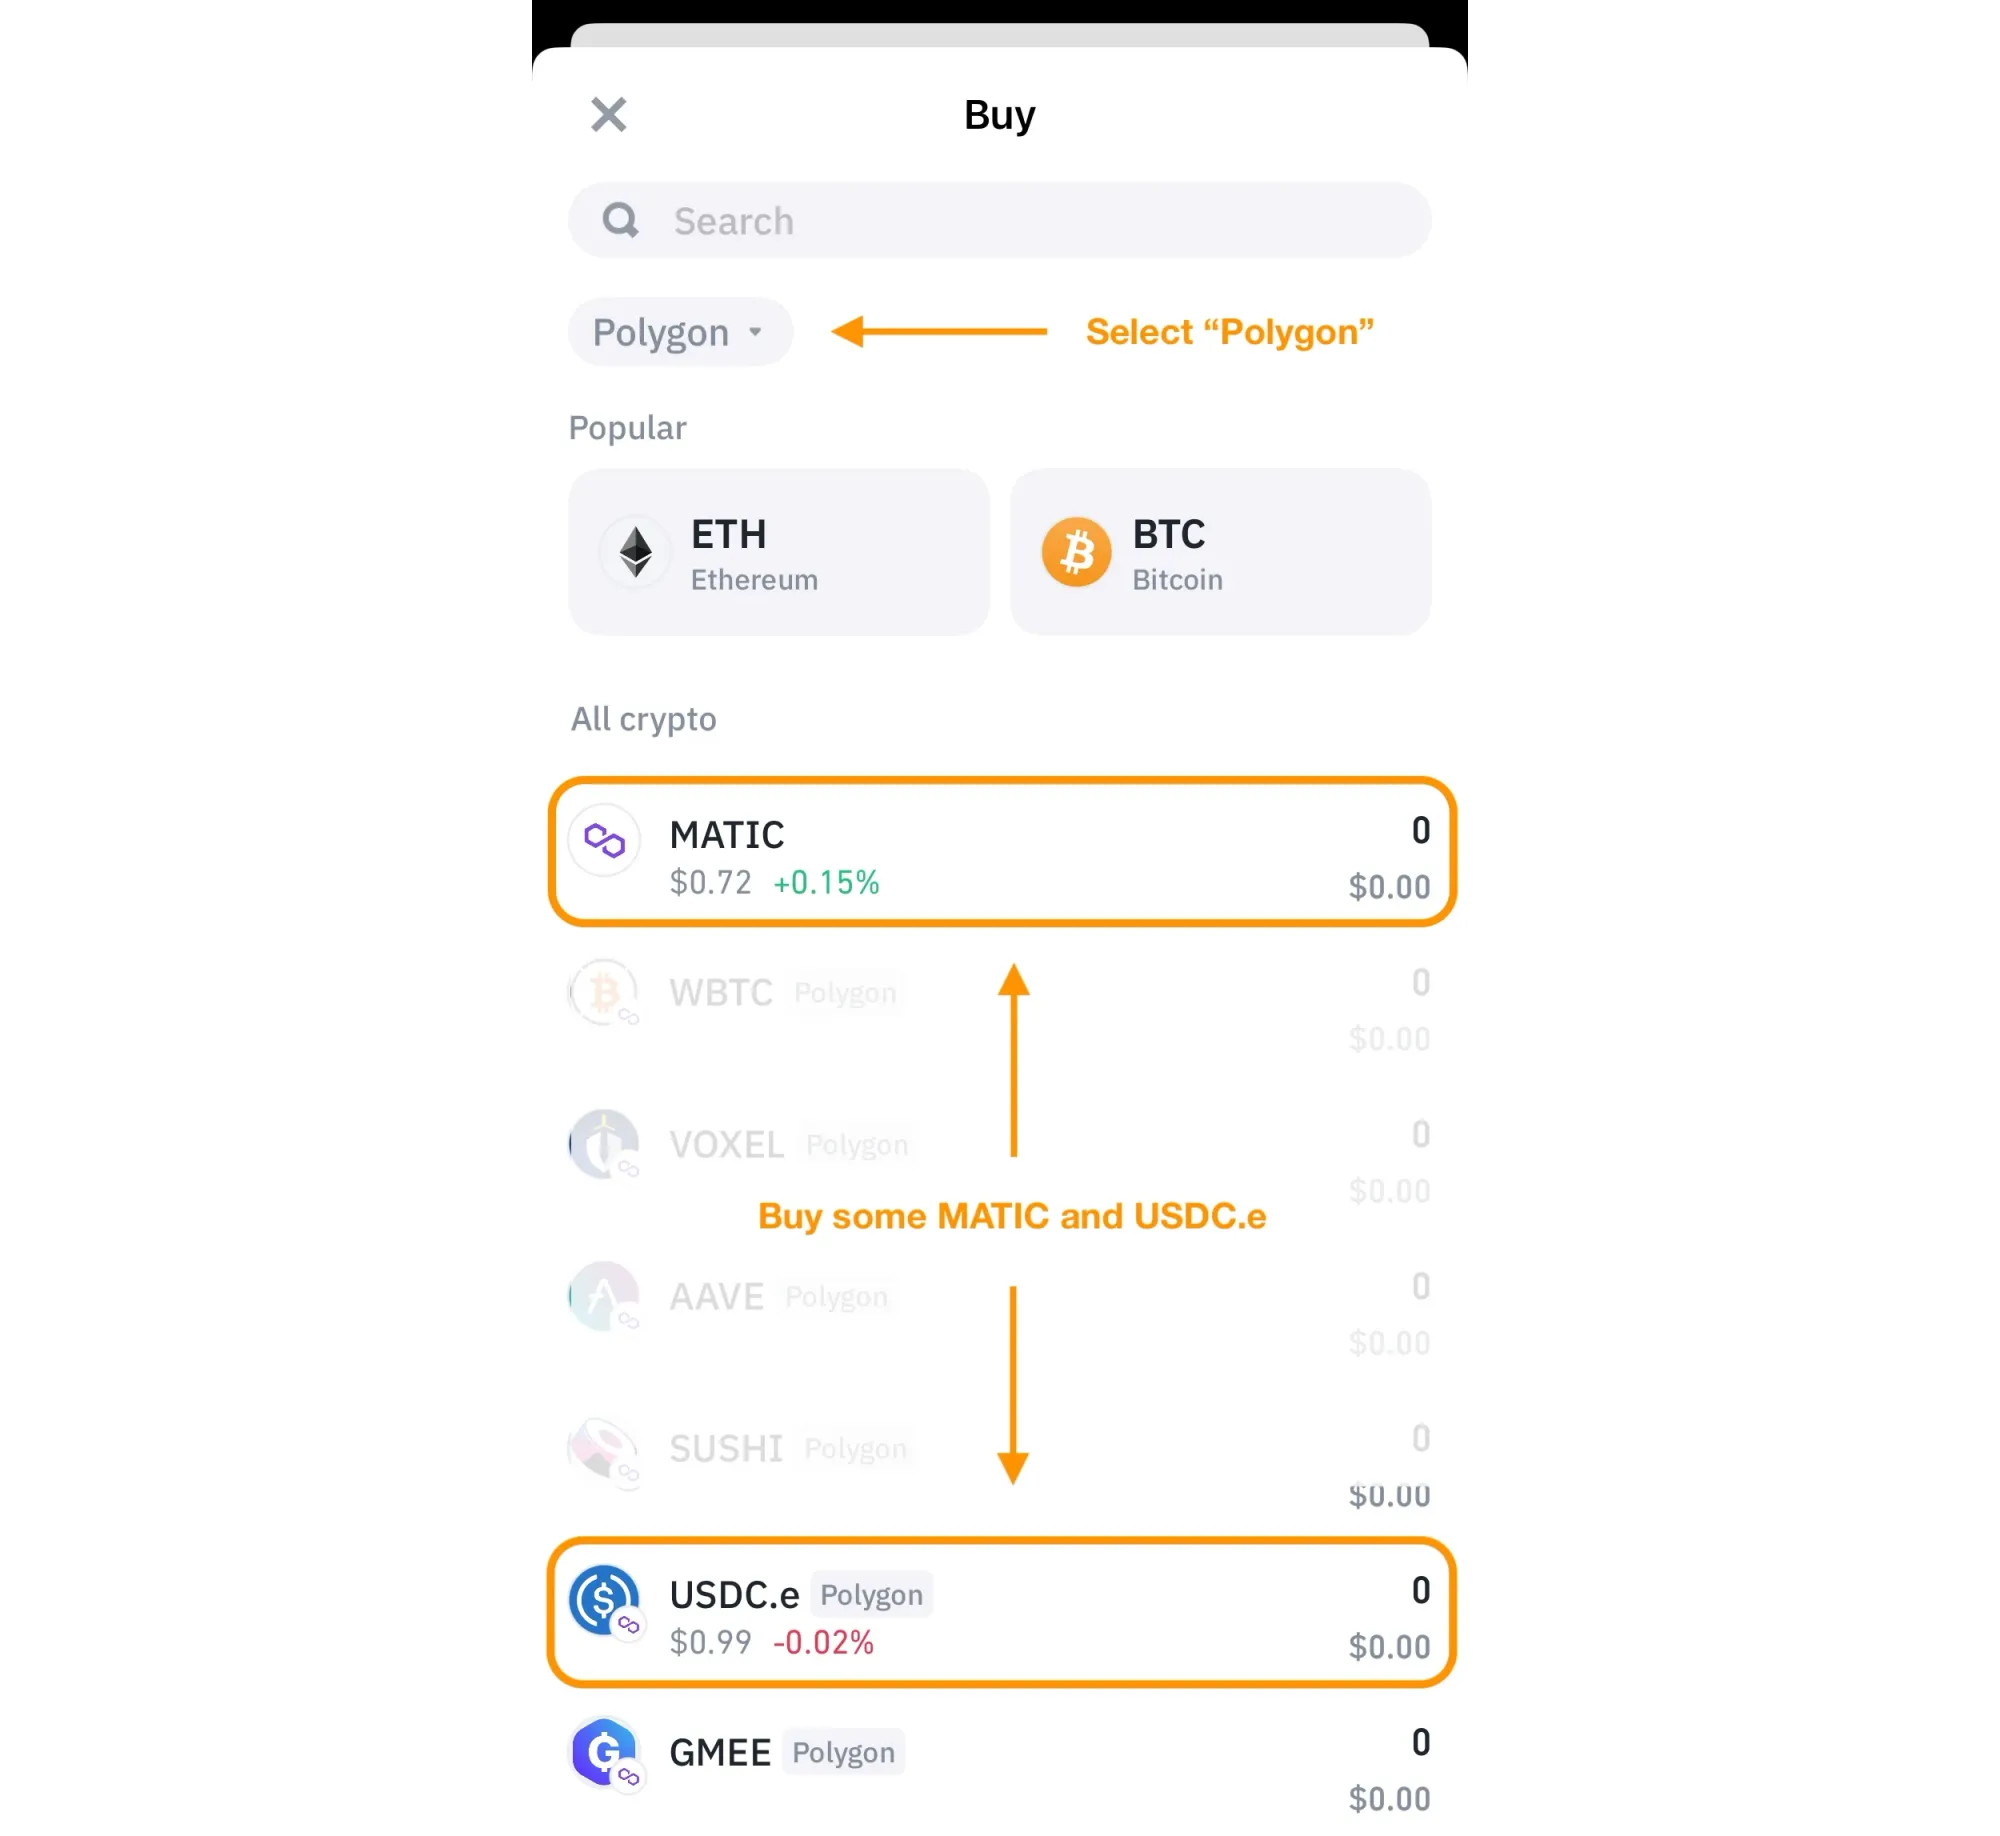
Select MATIC, which should be the first token listed. (Remember, we’re using MATIC in our example, but you should purchase the correct native currency identified in Step 3.) Gas fees on Polygon are relatively inexpensive — typically around $0.01–$0.02 — so you don’t need a lot. You can start with as little as $5.00, or you may wish to convert more if you plan to trade frequently and want some buffer. Enter your desired amount, select your payment method and provider, and then click the “Buy with…” button. The payment method and provider options may vary depending on the amount you wish to exchange.
Next, we need to purchase USDC.e, the denomination token required for our chosen strategy. Unlike MATIC, which is primarily needed for gas fees, the amount of USDC.e you purchase will depend on how much you wish to deposit. While it's perfectly fine to start small, such as $10.00, the amount you fund your wallet with should align with your planned deposit amounts. In Trust Wallet, go back to the “Buy” screen and search for USDC.e. Ensure you select the correct version of USDC for the Polygon network, and complete the purchase as before.
Well done! Your wallet is funded and you're all set to deposit in your selected strategy.
Step 5: Make a deposit
To initiate the deposit process, return to the strategy overview page and click the “Deposit” button in the "My Deposits" section to launch the deposit wizard. Confirm your wallet connection details and proceed to the next screen, which will display your wallet balance, showing the amounts of MATIC and USDC.e you purchased in step 4.
Next, review and accept the Terms of Service. You need to read through the entire document to enable the “Sign terms with your wallet” button. This acceptance is necessary once per blockchain or when the Terms of Service are updated in the future.
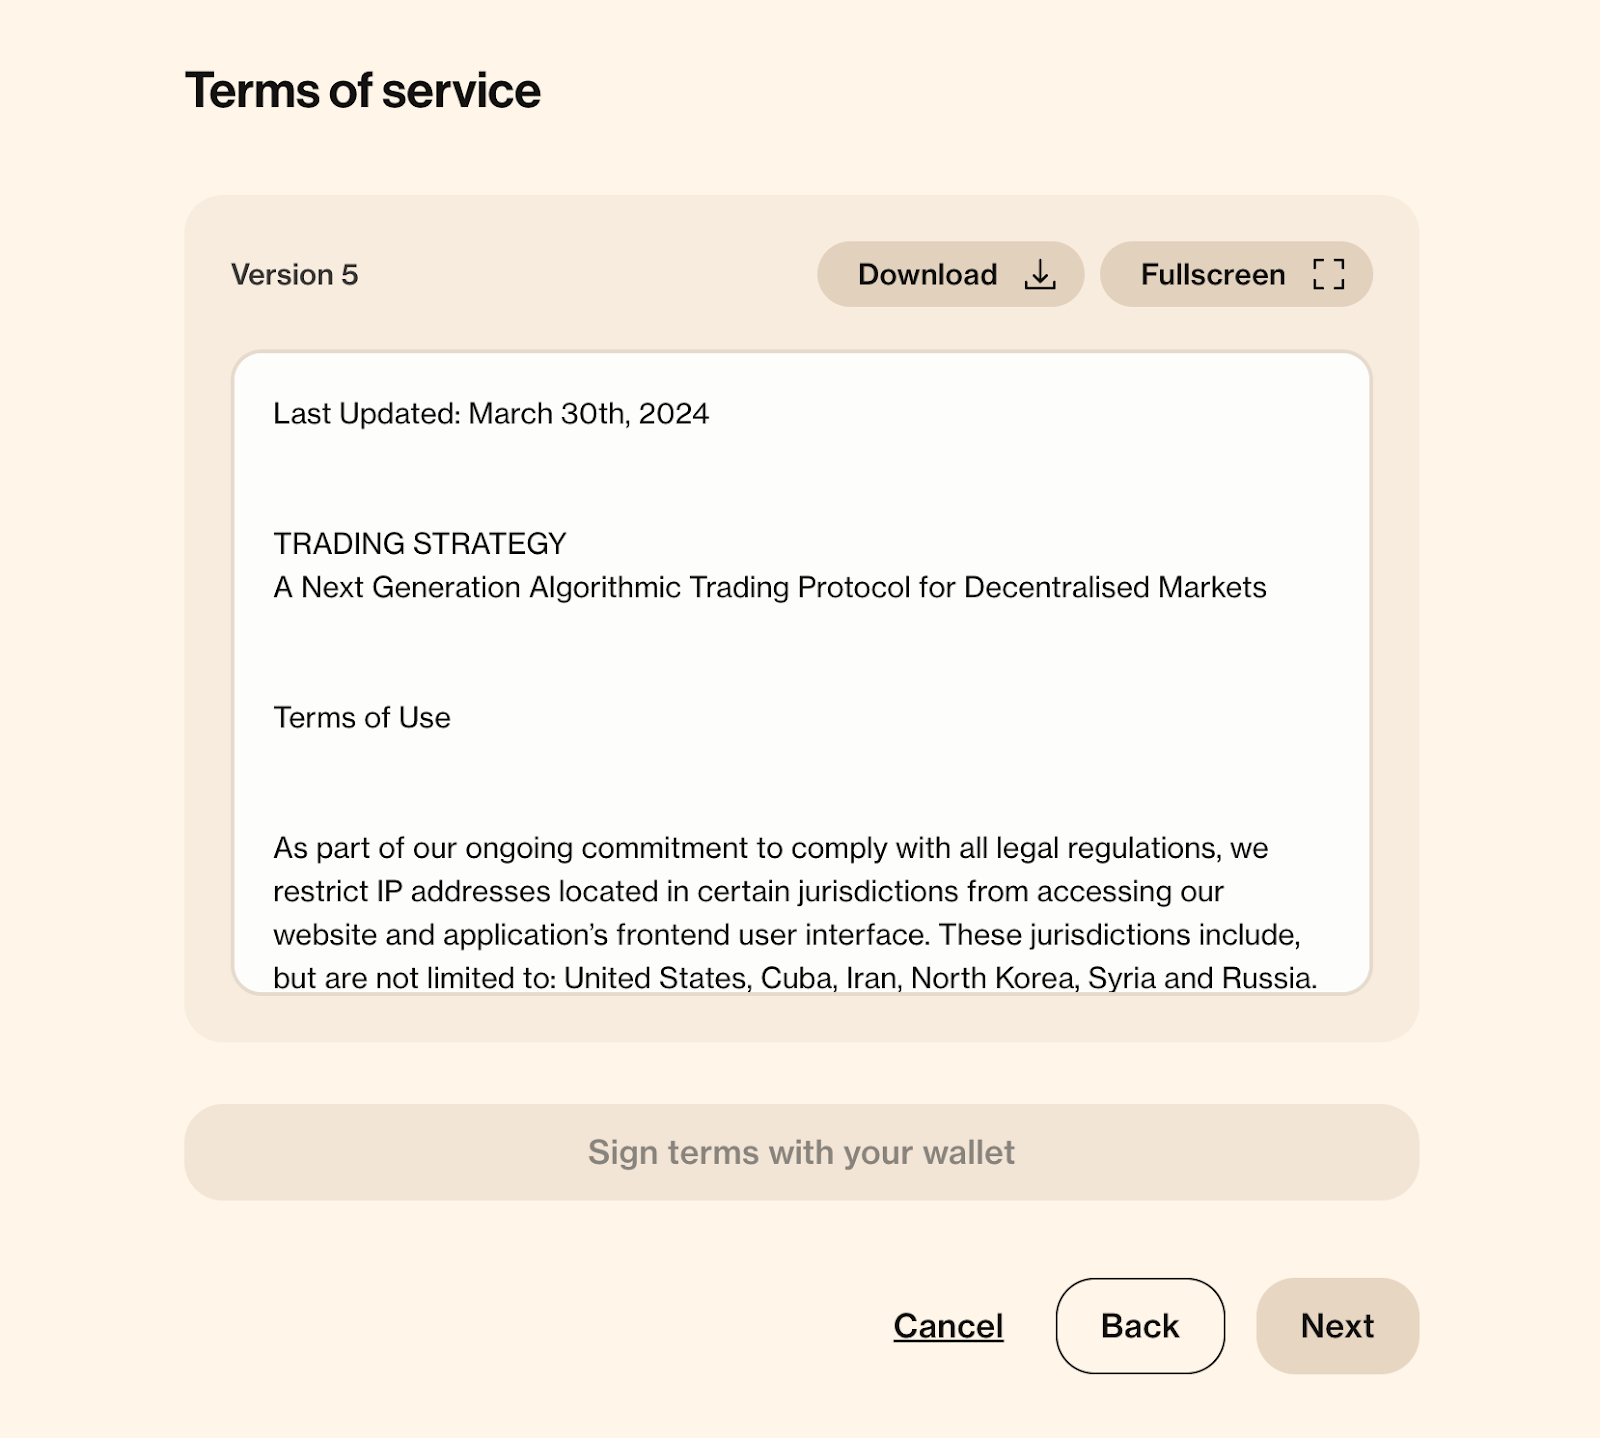
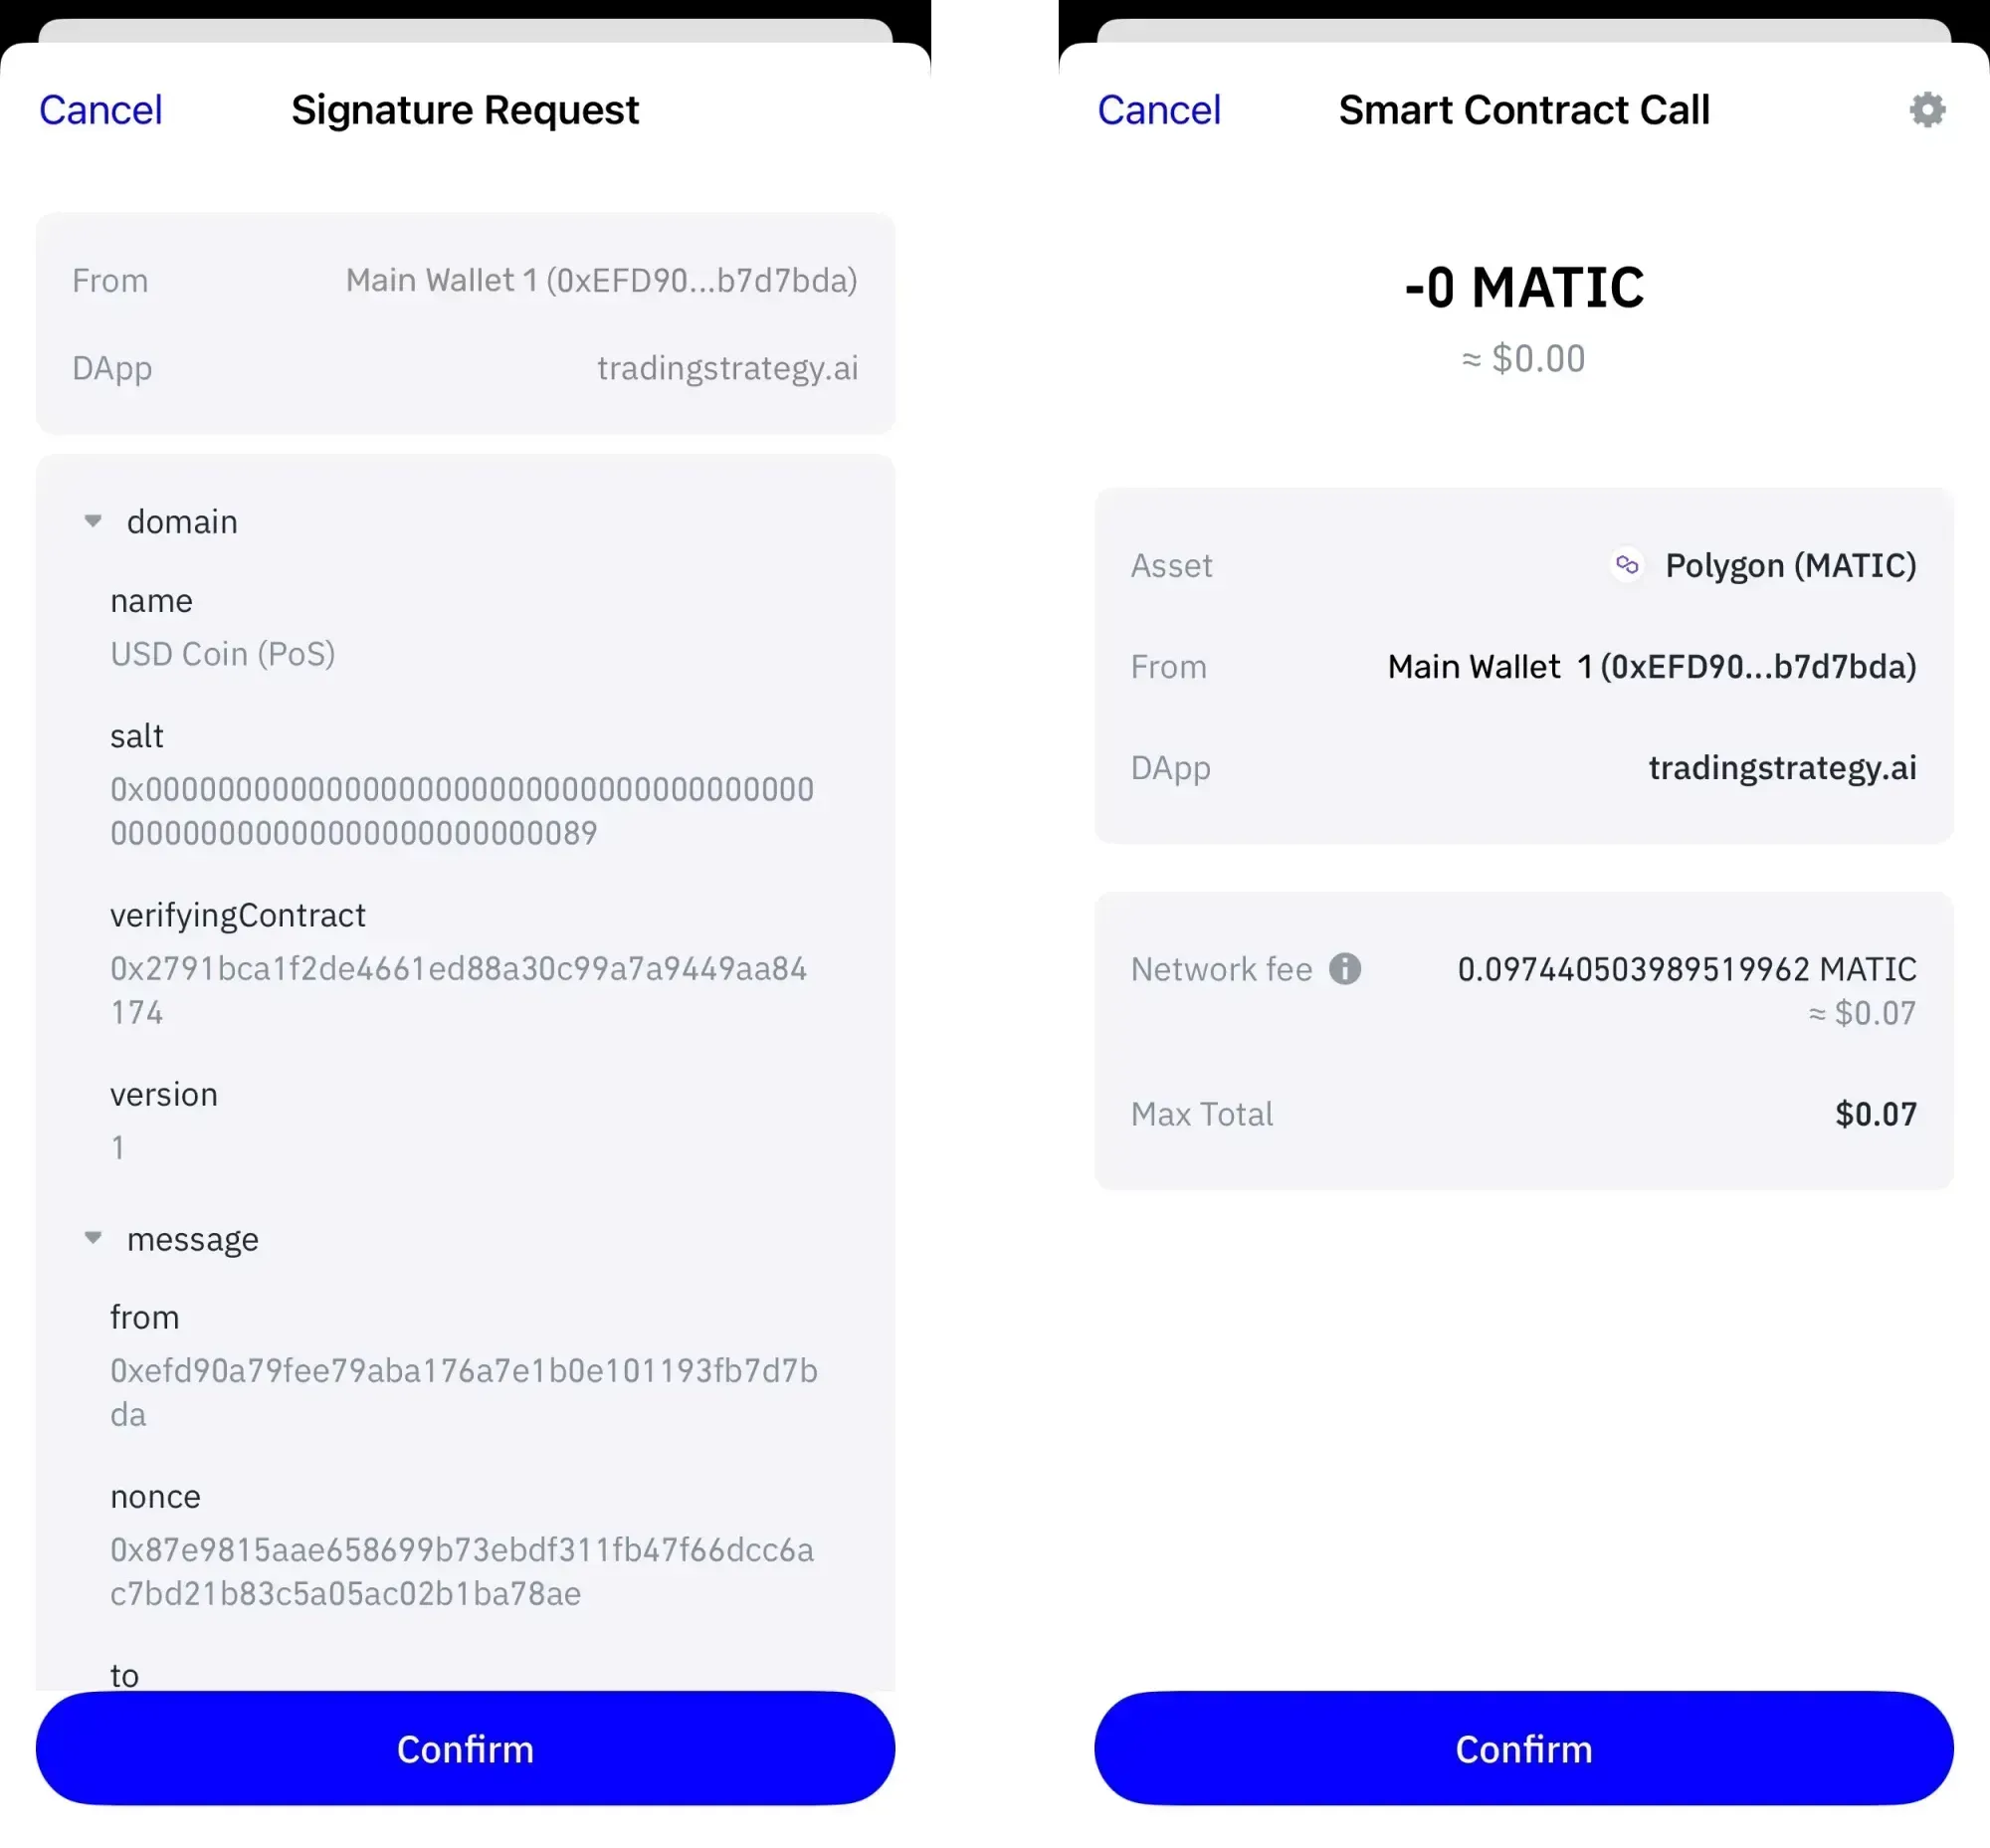
After accepting the terms, enter the amount of USDC.e you wish to deposit. Click “Make payment” to initiate the deposit. You’ll receive two requests in your wallet: the first is a signature request to authorize the transfer of USDC.e, and the second is the actual transaction request to deposit the USDC.e and receive your shares.
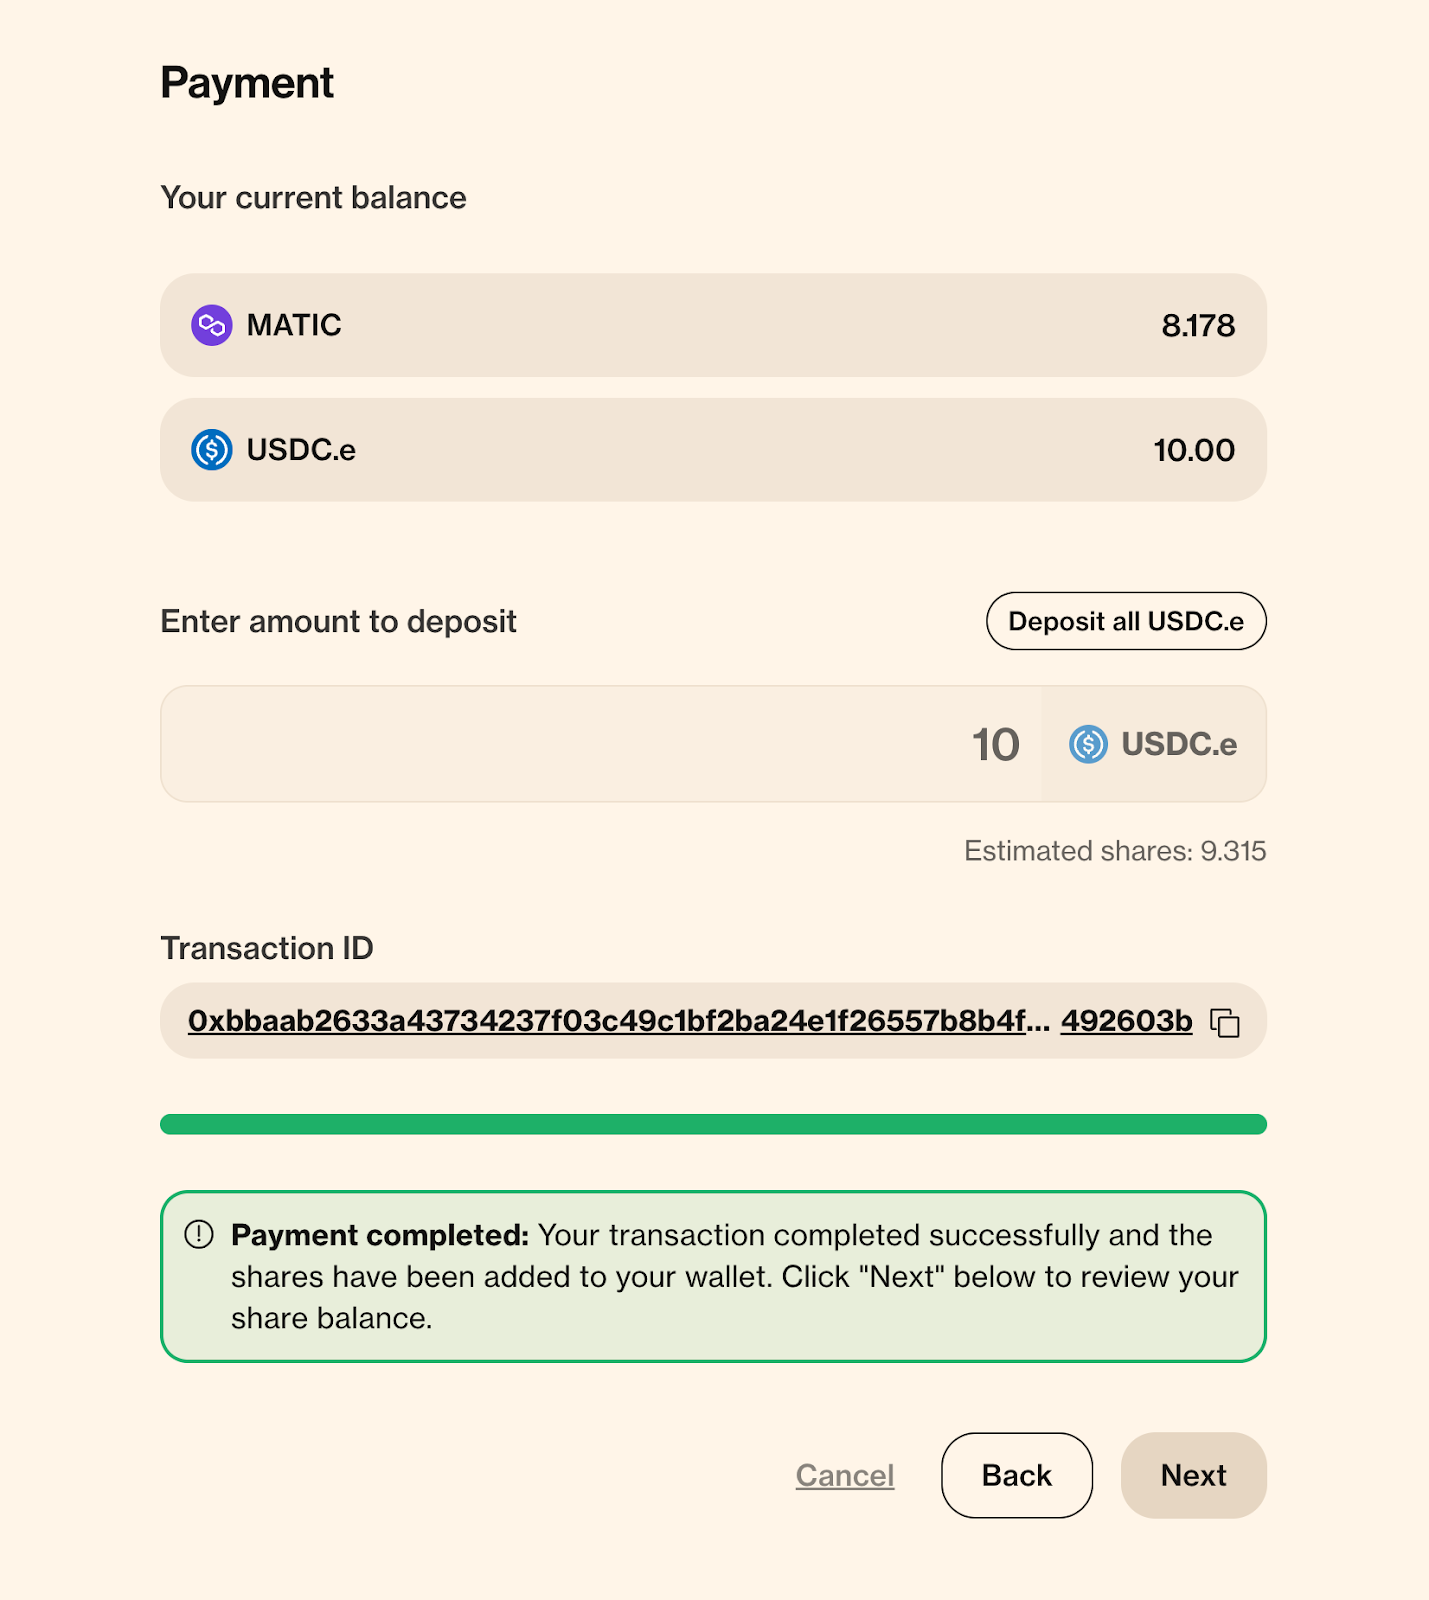
Once the transaction is submitted, a progress bar will indicate the transaction’s status. When the transaction is complete, you will see a confirmation message, and your shares will be added to your wallet. Click “Next” to review your share balance.
Voilà!
Congratulations! You’ve successfully made your first deposit into the ETH-BTC-USDC momentum strategy. You can now track your progress and explore more strategies.
Now it's time to see the currently available strategies.
- We have no direct relationship with Trust Wallet and make no warranties regarding its security or reliability.
- Past performance does not guarantee future returns.